Repurpose Your Postini Mailboxes and Settings with SecureTide by AppRiver
Blog
Thought Leadership
Repurpose Your Postini Mailboxes and Settings with SecureTide by AppRiver
Jordi Vilanova
Google continues to phase out Postini services in favor of the Google Apps platform. Consequently, we continue to receive requests to migrate Postini filtering accounts to SecureTide by AppRiver. In this post, we will discuss the process through which your Postini mailboxes and settings can be easily migrated to SecureTide.
To export all mailbox senders lists (approved and blocked), as well as the associated settings, you will need to follow some simple steps both to retrieve the data and to prepare it for our Phenomenal Care Support team, who will assist you during the migration to SecureTide. After the data is in place, we’ll help you change your MX records to redirect your mail through our data centers. Once the process is complete, your domains, mailboxes, approved senders and blacklists will be available through the Customer Portal and your spam and malware will be captured in our quarantine areas.
To export Postini mailboxes and settings, follow these simple steps:
1. Export Mailboxes and AliasesExporting the complete set of data is a two-step process that produces two separate source files. The first file to be exported contains mailboxes along with their aliases:
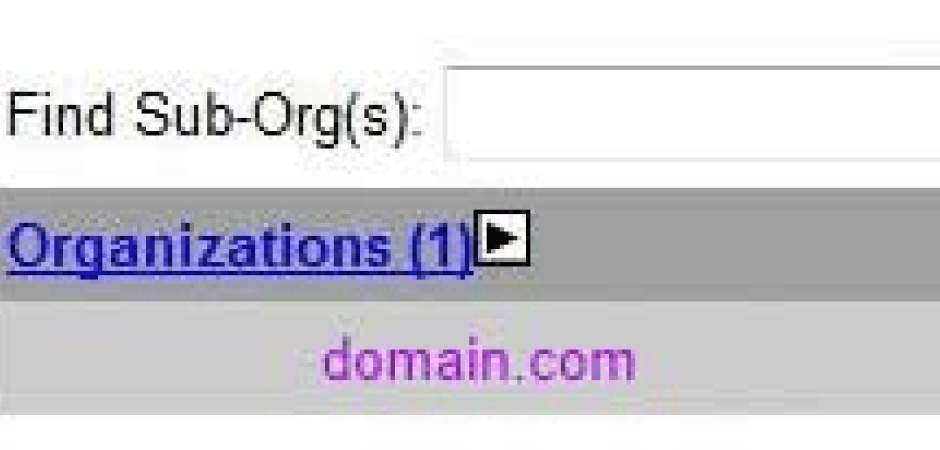
In the Postini interface, go to Orgs and Users > Orgs. Click on the domain you wish to export. (For this example, we will use domain.com as shown in Figure 1.  Figure 1. Select Domain
In Organization Management, note the Organization ID number located in the Settings section (see Figure 2).
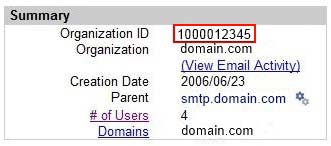 Figure 2. Note the Organization ID Number
Select the Batch link at the top of the page, enter the following command into the Manual Input field (see Figure 3), using the Organization ID number noted previously as the value for targetOrg and complete the on-screen instructions:
listusers ALL, targetOrg=1000012345, childorgs=1, fields=PRIMARY_ADD|ADDRESS, aliases=1, sort=primary_add:nd
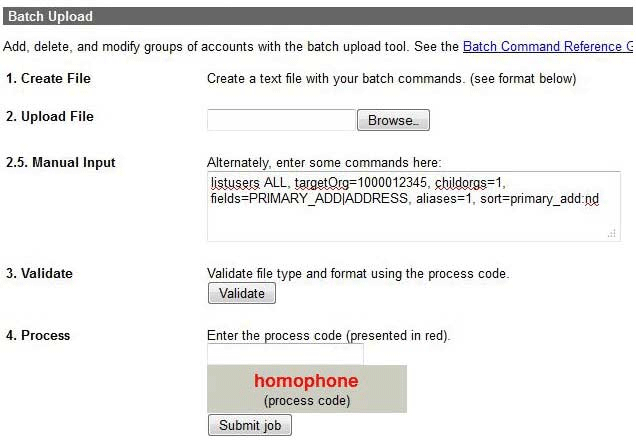 Figure 3. Export Aliases from Postini using the Batch Command
Select the batch results, copy and paste the data and save as a text file called domain.com_alias.txt. 2. Export Approved/Blocked Senders Lists
Continue as follows to export all associated Approved/Blocked Senders Lists:
Go to Orgs and Users > Users. Choose the top Account-level org from the Choose Org list. Click the Download Users/Settings link as shown in Figure 4.  Figure 4. Export Approved/Blocked Senders List
Select the Batch results, copy and paste the data from the popup window and save the data as a text file called domain.com_Users_Settings.txt. The exported data will contain such information as the # address, user_id, junkmail_filter to set email filtering active, category filtering levels, virus scanning settings, approved_senders, approved_recipients, blocked_senders, as well as other available inbox settings (see Figure 5).
 Figure 5. Sample file with Exported Settings Shown
3. Provide data to AppRiver for Migration
Now that you have all data exported into two separate files, send both files to support@appriver.com. Our Sales Engineering team will import your data to our platform and provide a walkthrough on AppRiver’s SecureTide service.
For further information on your Postini migration licensing options, please contact us at sales@appriver.com.